Showing posts with label stones. Show all posts

Sunday, October 28, 2012

Stones and Sketches


I hit up the Rochester Gem Show last week and got some nice stones from it. Though it seemed like this year the dealers had more specimen samples than cut stones I still feel like I found a ton of good examples, and I made smarter decisions about which ones to buy. I have plans for most of them at least; like the denim lapis on the tape strip and similar sized stones will be put into some more copies of the Jupiter Pendant, the snowflake obsidian piece will go into earrings, the sugilite I want to make into a pin, the unakite into a pendant, the list goes on.

I haven't been in the studio as much as I want to be, therefore I only have sketches of future plans for the production projects and a couple of designs for CAD.


I have been slowly working on the large rainmaker necklace (as I have dubbed it) at the top of this page and you can see some of the plans for my new stones and senior show here.


Laser cutting! All my laser cutting ideas for my Digital Methods class and another varation on my tube setting earrings for production. I am a bit excited to laser cut some earrings for sale and just ordered some sterling tubing for more production. If anyone wants to save the date for the student sale this year it will be December 5th and 6th opening at 10 AM or so each day.


I also want to have these drawings laser cut as a pair of earrings, perhaps they would do well in the sale?


Still haven't forgotten the earring jacket idea either even though I need to work on it some.

Also begining to run out of concluding noises and sounds to end my posts with this semester, but continuing with my subtheme of creepy radio transmissions from last week have the Russian Woodpecker.

This one is radio interference caused by the Duga-3 over the horizon radar system in Chernobyl meant to give early warning of missles coming from America to Russia. It was operational between 1976 and 1989 and interfered with shortwave radio to the point that devices and radios began to be made to eliminate the annoying noise caused by the system. Welp hopefully next week will have cheerier material and some jewelry being worked on to show the world.

Sunday, August 5, 2012

Nearly There

We're down to the last week of Summer semester, meaining it's time for a quick image heavy post about what has been done and what I still need to do. Observe then, eight pairs of tubing earrings with a total of 96 stones set in them finished.


 After that mess I moved on to the matching chain. the top picture is the holes being drilled for the chain links which shows off the tip I learned to clean up drill holes. You take a fairly large drill bit (at least three or four sizes bigger than the hole) and twirl it by hand a few times in the hole. It makes a nice beveled edge and knocks off the burs as evidenced on the left.


Bonus: my chain has this cute handmade clasp. Hopefully, it will stay working for quite a long time. I have actually finished this necklace and set some 40 stones in the ends of the tubes, but of that will have to wait a bit.

I finished six pairs of triangle earrings to add to the random production stuff. Just, you know, putting that out there too. I still have to lacquer some of the record/laserdisc/brass earrings and I decided to to give some of the "backwards" earrings a shot, making some in acyrlic and some in sea glass. Glass drilling experiments ahoy!


For rubber mold making I got the molds to work well enough to cast them. Here are the waxes from those molds with the stones sitting in them for fun. I still like the rutliated quartz in the ring.

In the center of this image is the incomplete casting from the first attempt at it and the waxes for the second attempt which failed even MORE via a blowout.

Thus this is the third attempt at casting the rubber molded jewelry, before I attached the squiggly pendant wax to the top.

It worked! The third time it worked! I had to ask another student about production sprueing and have them check it over, but it worked! Hooray, I can have fun with the long road to clean up, as well as setting the stones into these. Ideally I'd like to finish all this over the weekend, but I have to come into the studio Monday and Tuesday at least to conquer a production side project.

So much to do and so little time as always, if I stay motivated I will finish before next Friday (that's six days!) and have two weeks off to pack up for college full time. Plus I keep coming up with other projects and designs I want to start on instead. Well, at least next week there will be some prettier pictures as we look back on an incredibly hot Summer's worth of work!

Wednesday, June 6, 2012

Error! Recalculating... Error! Recalculating...

A lot changes in a week, for example my fancy Jupiter pendant from last week has turned into this:

Which then abuptly turned into this, ready for casting:

and it will be casted in brass this Thursday! I was also going to set these turquoise stones (plus a CZ in the little end loop) in it much like the lower right sketch, but I dropped one and broke it.

Oh well, it wasn't a particuarly great stone to begin with as I now realize. It's off to riogrande.com for a new, kind of expensive one.

Now because I wound up doing last minute cleanup and investing for casting my Jupiter pendant for mold making, I haven't gotten as far as I had hoped on my hydraulic experments for the production side of things.

First I tested what little I was able to round up and send through a rolling mill to "print" the texture on the metal. Above is what was left of the strings I used and wound up with shallow rope like lines on the sheet metal. I also tried some cheap old lace stuff which survived the mill, but also gave me a shallow kind of stippled pattern. Oddly the novelty paperclips worked perfectly well, observe:

And despite being probably made of steel neither the paperclips, copper, or rolling mill was ruined (well further ruined in the case of our old rolling mill, no wonder its being replaced).

In terms of what to actually do with said hydraulic forms and textures has been all thrown out the window at this point due to a debate between high end and low end jewelry. I had a inital idea to combine paper origami with metal in earrings etc. in order to have something within the twenty dollar or lower range for the student sale. Most of this short sightedness is due to the shawl pins from the last sale being too esoteric and too overpriced an item to sell and needing money to finance long term tools.

But since the mixed media with paper thing is border line junk that could be cranked out at a later date, I've re-thought a little for the long term and am thinking 
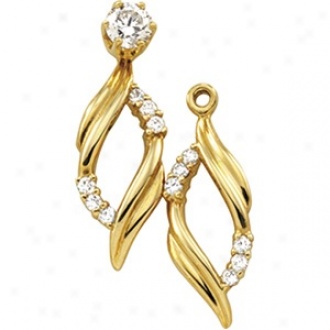
earring jackets are the way to go.


They're out there but not too out there, if you know what I mean. This way I can offer a cheaper alternative to the gold and white gold examples above and still have the mix and match modularity with the customer's own earrings I orginally was thinking about last week. This way the rubber mold making stuff can be higher end, and the bottom end can be the d-pad pins, a trefoil flower pin with a shape that accidentally looks like the Mitsubishi logo, and the hydraulic triangle earrings with roll printed designs I made for myself. Also stone settings and studs with white cz's would be relatively easy to make in order to pair with them.

Naturally now that I have some semblance of a plan I feel like I wasted a bunch of time on mostly unusuable hydraulic dies and other materials, but at least gained the advice that I should approach making jewelry to sell the same way I approach getting an art style which is to not force it and just let it develop on its own, meaning that I shouldn't try to predict what will sell to a market while trying to tailor to it and just make some cool designs I like.