Wednesday, February 23, 2011

How To Make Asteroids, Part One

Step One: Mark your green carving wax with a scribe.

Step Two: Saw apart your wax block into little 2 x 2 x 3 cm blocks in your very cold garage.

Step Three: Saw off the corners of each block.

Step Four: Take your wax file and shave the blocks into an asteroid like shape.

Step Five: Take your carving tool and smooth out the file strokes with your favorite carving tool.


Step Six: Dremel the blocky asteroid into better shape and texture with a ball bur in a questionable set up in your much warmer basement.

Coming up in part two of asteroid making: drilling, cutting in half, hollowing out and making it fit together again temporarily!

Sunday, February 20, 2011

6 Little Asteroids in a Row...


I've been working hard so far on break, and had to post the progress! From 8:00 to 11:00 tonight I have been cutting and filing little cubes of carving wax about 3 cm by 2 cm by 2cm. Above are the six very rough wax asteroids that are the result of all that carving. There is a lot of detailing to be done from refining the shape to making them a tad smaller to adding craters and other texture with burs.The full details of the process I use in fashioning the asteroids will be in an upcoming post. (Post is Available Here!)

On a side note it seems my life likes to run in funny coincidences. Before I went on break, one of my suite mates was eating a grapefruit and wishing she had a grapefruit spoon to eat it with. Lo and behold, I received a set of grapefruit spoons while on my break to use in jewelry!
And these are they. The serration on the tip of the spoons is kinda science-fictiony especially since most of us don't use this specific type of silverware regularly; i.e. they look a little freaky. But, these spoons have given me great inspiration for the tiara project which is coming sooner than I think. So, to prepare, I picked the two spoons on the right from an estate sale for extra material. I also think I'll commit the unthinkable and turn the far right teaspoon into a ring, with a little variation so it's not so ordinary. Thus I fall back on the old mantra of every crafter: so many projects, so little time!

Thursday, February 17, 2011

Ugh, Part One of Infinity


So after experimenting with brass and looking into reticulation, I have discovered the extremely obvious. Reticulation is a surface treatment only (which I should have known) and one cannot melt brass into a blob with out its surface tension pulling it into a round button and then try to reticulate that back into an irregular shape. Since nothing in the above picture looks remotely anything like an asteroid its time for a complicated plan B. Plan B hinges on the fact that one can cast in brass. The downside is having to come up with 17 or so wax asteroids to go through the process with.

I had thought about a technique demonstrated in class of making a water based clay asteroid, making a negative plaster mold from that, than pouring hot wax in for an asteroid in the correct material for casting. The problem with this is that it's not the greatest method for handling objects that are meant to be fully three dimensional with out a flat side; although it gives me a great idea for pins to mass produce, sell and have nothing to do with science fiction. So, I am left with carving the asteroids straight from wax. It's a long task more than anything but, I have an entire four day weekend to do it.

Other parts of my project have barely gotten underway. The 12 gauge silver wire I ordered a week ago has finally arrived at my house, although the ingot the professor poured isn't quite ready to be soldered to it.


Here it is earlier in its life, when, after it was poured, I had to hammer it into a square rod. It has since been sent through the rolling mill twice and been hammered back into a round "wire" of sorts. What the professor has planned for it next I don't know, but without her help this project would be going nowhere. Still it is now impossible with the wire showing up late and needing to cast to make next Wednesday's deadline. Hopefully the next project won't wind up as complicated as this one has...

Wednesday, February 9, 2011

Asteroid Fields Forever

As promised, my entire snow day was devoted to homework, which was mostly four classes worth of art history readings. And, thanks to the sweet, sweet internet on top of it, I am even later in posting final sketches. But, to make up for it, I will post the absolutely amazing steel and duct tape necklace models too! 


The left image is the sketch of the asteroid necklace from the last post and the right is the wire model version. Not visible is that there is no chain in back, its entirely wire with a gap to fit around ones neck like a cuff bracelet fits around a wrist. These types of necklaces are as commonplace as this design, though they're usually one plain wire to accomodate a slide pendant. I knew this design was going to be boring: the only way to make it futuristic would be to flip it upside down and wear it on my head for the tiara project next.

Very Silly.
So what if the gap in the necklace wasn't in the back but in the front much like this style here? well then we wind up with this:

Once again the idea isn't agressively bad, it just lacks that certain special sci-fi something. What makes this design leap that extra step?


Zipping right up off the shoulder! Much of science fiction is taking an idea to its extreme limits and that includes all the impractical doodads jutting out of helmets and headdresses of scf-fi costumes, examples I have surely seen, yet what ever terrible movies or book covers they graced have been completely blocked out from my memory. Nevertheless, what started out as a simple desire to melt brass has quickly grown into something stupidly complex, curiously like nearly every other jewelry project I design. I swear I don't plan for these things to be this way!


I'm sure everyone by now has noticed the missing asteroids from the models. This is due in large part to being too afraid to find out how much the extra weight will deform the necklace, and realizing clay does not have the same mass as metal for testing purposes. Plus, I only have five feet of sterling silver wire, which means there are only three 20 inch pieces that aren't quite enough to make it around a neck. So, after much discussion with the professor, we devised the master plan illustrated above and detailed below.
  • First, we cast a silver ingot for the back of the neck piece highlighted in blue, and lengthen it with a large asteroid on one end.
  • Next, I solder three 20 inch pieces of 12 gauge round dead soft sterling silver (which is in the mail) to the other end then bend and hammer to work harden and shape it. the ingot will provide extra length to keep the necklace on the body and hopefully have more wire rising off the shoulder for a dramatic effect.
  • Lastly, melt, reticulate, and drill brass asteroids to string on the wire with spacers of some sort between them.
Right now I'm hoping the necklace comes together as planned, and if im extrodinarily lucky I won't need any of the structural reinforcement ideas on the above sketch, I have no idea how to incoporate them into the piece smoothly. Until next week however it's time to do some reticulation research!

Wednesday, February 2, 2011

Reject Parade: Kinetic

So to begin the great vision quest of junior jewelry here are the ten sketches for kinetic adornment, and why they were or weren't used for the project.
Number 1
This was meant to be an exploding asteroid pin made of reticulated brass blobs with smaller ones suspended on springs. Thus, making it a trembler pin that wiggles with the movement of the wearer. The problem is that most trembler pins hide the springs, and this one doesn't, which detracts from it.


Number 2
It's a poseable robot pin, nothing to see here move along please.

Number 3
A rocket slide necklace where the rocket can move around the wire as opposed to just hanging off of it. And a possible trail of sliding gems behind it too. Its not the worse of the designs but it is fairly typical and expected as pointed out in class.
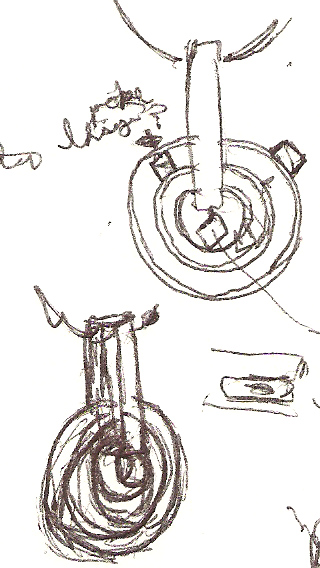
Number 4
Here's one that could be interesting if developed further. This "rocket ring" features movable riveted nickel-silver fins and brass exhaust. The design is based off of the robot parrot from the Doctor Who episode "The Pirate Planet" which is a great story combined with a greater visual look then most episodes from the 1970s.

Number 5
It's a model of a solar system awkwardly grafted to a cuff bracelet. Includes hot orrery action with planets sliding on swiveling wire orbits around a crystal sun.

Number 6
And here is the same concentric solar system idea half baked from the side as a pendant. The planets instead somehow become spacers between the orbital rings. 

Number 7
Oscilloscopes pop  up in science fiction frequently enough, and this bracelet strings together a representation of that distinct round display and wavy line. The movement is limited to the wave form spinning about the central axis that pierces it and the overall design is simple and straightforward. I rarely make bracelets so this seems like a fun piece to do at least in my spare time.

Number 8
Another possibility was to mount the reticulated brass asteroid nuggets into hexagons and string the hexagons up into a standard necklace. I still haven't decided if it looks science fiction-ey enough, but hexagons are clearly the shape of the future!

Number 9
Here's a copper bangle bracelet with little silver ships sliding around it. Not much to say, other than the ships would catch on absolutely everything if you wore it.

Number 10

Dun, dun, DUN! the final sketch and the design that has been chosen for the project. This asteroid field necklace combines the reticulated brass nuggets with the sliding (or spinning) movement on wire idea from numbers 2, 5, 7, and 8. A proper drawing incorporating more elements from number 2 will be posted by the end of the week, since I have all day to work on it now that the college has closed for the eighth time in its history (according to facebook hearsay) due to the weather! Until then it's off to happy drawing land!